- Home
- Birthday Cards
- Easter Greetings
Send Easter Greetings
Make Your Own Cards
Unique Easter greetings with flair - that's what you want, right? Here are two more of the several Easter greeting cards that you can make for this Easter celebration.
No Easter theme rubber stamps? No problem! Easter is a joyful occasion - a celebration of the resurrection of Jesus Christ. So images like flowers, butterflies or any that has a light happy mood will do.
Christians usually like to use an image of the cross because Jesus died on the cross and rose again on the third day. The decorated egg is also used for Easter greeting cards as it speaks of new birth, and so forth.
The following two Easter card designs are part of a set I created this year. You can view the other two card designs by clicking here.
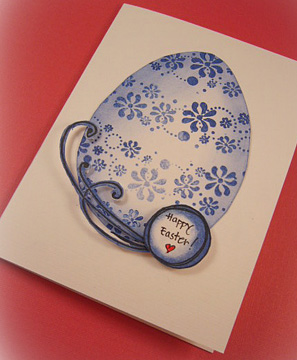
For the first Easter card design, an egg shaped template is used. Just hand draw an egg shape and cut out to use as a template.
Easter Greetings: Happy Easter!
The colors used for this Easter card are white, blue and a bit of red.
Card Making Supplies Used:
- White color blank folded card
- White cardstock
- Pigment ink pads: blue and black
- Clear embossing powder
- Heat gun
- Rubber stamps: borders clear design stamps by Hero Arts and flourishes clear stamps by Inque Boutique
- Scissors
- Glue
- Black permanent ink pen
- Fine sandpaper (optional)
Card Making Instructions:
- Make a egg shaped template using a piece of graph paper or card stock. I roughly drew one that's about 3 by 4 inch on a piece of graph paper and used it to trace onto white cardstocks.
- Place it on the white cardstock and trace around the template to get the outline of an egg.
- Cut out and if needed, use a fine sandpaper to smoothen the edges.
- Place Hero Arts border clear stamp on acrylic block. Make the border curve a bit.
- Ink with blue pigment ink and stamp onto the egg shaped white cardstock. (You can refer to the picture above to get an idea of on where to stamp on the Easter egg.)
- Pour clear embossing powder on the stamped image, shake off excess powder and heat to melt the powder.
- Repeat with the same clear stamp design until the egg shaped cardstock is fully filled with some designs.
- Use the same blue color ink pad to swipe over the edge of the egg shape. Or you can use a piece of polyester foam to apply the ink. Make sure that the edges are darker and leave the middle part white to give the egg a 3D look.
- Ink the flourish and hand-drawn flower center clear stamps with black ink and stamp on white cardstock.
- Embossed with clear embossing powder and trim around the stamped design. You will also need to snip and cut out the center too.
- Go over the flourish with the blue ink. And also on the edges of the flower center.
- Use a black permanent ink pen to write the Easter greetings, 'Happy Easter!'. Draw a tiny heart and color with red marker.
- Apply glue and attach the egg shaped card stock to the front of the white color blank folded card.
- Attach the flourish image and the flower center to the bottom of the Easter egg with double sided foam tape. (Refer to the photo above for placement.)
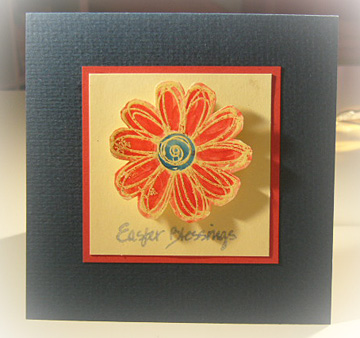
Easter Greetings: Easter Blessings!
The colors used for this Easter card are navy blue, red and cream.
Card Making Supplies:
- Navy blue color blank folded card
- Cream color cardstock
- Red color cardstock
- Pigment ink pads: blue and Versamark
- Clear embossing powder
- Heat gun
- Rubber stamps: blissful blossoms cling rubber stamp set by Lizzie Anne Designs and easter message clear stamp by My Sentiments Exactly!
- Scissors
- Glue
- Black permanent ink pen
- Markers: Red and blue
- Brush
Card Making Instructions:
- Ink flower rubber stamp with Versamark pad and stamp on cream cardstock.
- Pour clear embossing powder on stamped image, shake off excess powder and heat to melt powder.
- Color the flower image with red and blue marker.
- Cut cream color card to size 2.75 inch square.
- Cut red color card to size 3 inch square.
- Ink part of Easter message stamp with blue pigment ink and stamp on bottom of cream square card. Heat embossed.
- Layer cream square card over red square card and attach to the front of the navy folded blank card.
- Attach flower to cream square card with double sided foam tape above the Easter greetings.
This is a quick and simple Easter card but the bright red, cream and navy blue color combination makes this Easter card very attractive.
More Easter Cards
Like This Site?
|
| |
Celebrating Creativity! Connecting Lives!
~ bringing cheer one card at a time.
Help Me Get The Word Out

If you like making greeting cards and want to encourage others to do so because of its many benefits, please help me share this website with your friends. Just click on the share buttons below to share with your fans and friends. Thank you for sharing the good things in life :-)

New! Comments
Have your say about what you just read! Leave me a comment in the box below.