- Home
- Birthday Cards
- Shaker Cards
Everybody Love These Shaker Cards!
Shaker cards are fun to make. And if you know the technique, it is relatively simple to create them. Children especially love them.
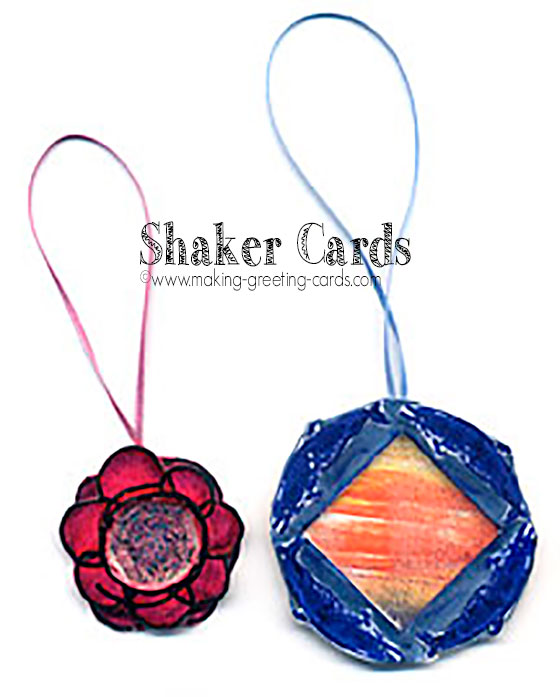
In fact, I made these shaker bookmarks with my niece and nephew and they enjoy it so much. But when you are working with children, just be sure to help out with the cutting because you will need a sharp blade to cut a opening or window. You can also use an aperture card to make them.
It's possibly derived from those Shaker musical instruments which are comprised of containers that are filled with loose beads and when shaken give out percussive sounds.
I remember when I was a child, I had one of those shakers.
Well, a shaker card has a compartment created by attaching two pieces of cardstock using foam tape. The top piece of card has a window cutout and replaced with a piece of transparency. This way, we can see the loose beads inside the compartment.
Here are two shaker bookmarks I created with my niece and nephew. Not so practical but fun to make. More like ornaments :-)
Note: If you can make these ornaments, you can make any shaker greeting cards because the technique is the same. You can make the frame as big as a rectangle card front or a circle card with the shaker centre position in the centre or anywhere inside the frame.
Cardmaking Supplies for Shaker Bookmarks/Ornaments:
- 2 pieces of Cardstocks
- Micro Beads
- Rubber Stamps
- Foam Tape
- Sharp Blade
- Transparency
- Ribbon
- Glue
- Double-sided Tape
Cardmaking Instructions for Shaker Bookmarks/Ornaments:
- Decorate one piece of cardstock with rubber stamping.(You could also decorate it by applying some colour with your inkpads)
- Ink the rubber stamp with black ink and stamp onto the other piece of cardstock.
- Cut out a window in the centre.
- Color the stamped image.
- Use double-sided tape to tape the transparency to the cutout window.
- Turn the card over with the right side facing down.
- Apply foam tape around the window on top of the transparency. (Do not peel the top strip covering the tape)
- Pour some micro beads inside the compartment created by the foam tape.
- Peel off the strip covering the foam tape.
- Adhere the other piece of cardstock on top of the compartment with the decorated side facing down.
- Press around the taped area to make sure that both the cardstocks are properly sticking together.
- Now you can shake it and it will gives out some percussive sounds.
- Attach a piece of ribbon with glue.
There! You have a shaker ornament.
Making Greeting Cards! › Fun Cards › Shaker Ornaments
Like This Site?
|
| |
Celebrating Creativity! Connecting Lives!
~ bringing cheer one card at a time.
Help Me Get The Word Out

If you like making greeting cards and want to encourage others to do so because of its many benefits, please help me share this website with your friends. Just click on the share buttons below to share with your fans and friends. Thank you for sharing the good things in life :-)

New! Comments
Have your say about what you just read! Leave me a comment in the box below.