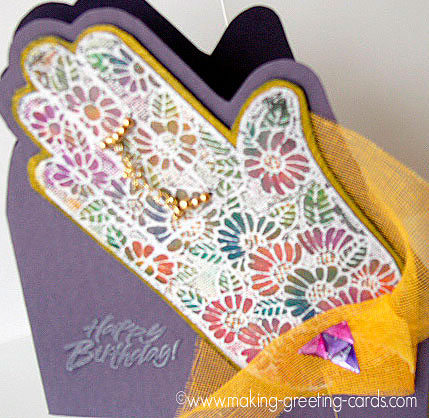
Henna Tattoo Card 2 - A Happy Birthday Card
Henna Tattoo Card 2 - A Happy Birthday card I created using the henna sticker I bought from Little India. I love visiting Little India; the crowd, the color, the smell of the various spices and the music that makes you want to dance.
Well, it brings back lots of memories from my stay in Pakistan. I visit Little India at least once a month, to shop and also to visit my friend Shanti and also Velu and his wife.
Anyway, here's another card I created using the henna stencil. It's different from the other Henna Tattoo Card.
For this card, I was feeling more colourful and adventurous and because I was thinking of my friends in Little India, I created this card specially with them in mind and thus with gold beads from my jewelry-making stock.
Anyway, have a look!
Card Making Supplies:
- Henna hand design stencil
- Pigment Inkpads: red, purple, yellow, green, blue, white
- Foam Stomper or Dauber or Stencil Brush
- White cardstock
- Scissors
- Clear embossing powder
- Gold color beads and jump rings
- Bead wire
- A piece of yellow netting
- Some plastic jewels
- Happy Birthday rubber stamp
- Heat gun
Card Making Instructions:
The hand sticker is made of plastic so it's reusable. Just wash and air-dry.
- Position and paste the stencil onto the white cardstock
- Use the stencil brush and pounce on the inkpad
- Pounce on the card. Use different color but start with the lightest color first.
- You can peel a portion of the stencil to check.
- Also apply ink around the stencil to get the border of the hand design.
- Peel off the stencil.
- Pour embossing powder on the design.
- Shake off excess and heat with heat gun.
- Pierce holes on the index finger of the pattern. Two on top and another two below.
- Put beads into the wires, attach to the finger to look like two rings.
- Tighten wire by twisting wire behind the card.
- Hook jump ring to one another to make a chain and attach to the two rings.
- Cut around the hand pattern.
- Layer onto gold card, trim around hand pattern leaving a border.
- Arrange netting around the bottom of the hand.
- Attach the plastic jewels with glue.
- Layer onto a purple blank card.
- Stamp Happy Birthday with white ink.
- Pour embossing powder and heat.
- Trim the top of card around the hand leaving a border.
Making Greeting Cards! › Fun Cards › Here
Like This Site?
|
| |
Celebrating Creativity! Connecting Lives!
~ bringing cheer one card at a time.
Help Me Get The Word Out

If you like making greeting cards and want to encourage others to do so because of its many benefits, please help me share this website with your friends. Just click on the share buttons below to share with your fans and friends. Thank you for sharing the good things in life :-)



New! Comments
Have your say about what you just read! Leave me a comment in the box below.