- Home
- Birthday Cards
- Rubber Stamping Supplies
Rubber Stamping Supplies For Card Making
Rubber stamping supplies are now available in most craft stores.
Below are some of the rubber stamping supplies that I have accumulated these last few years. You do not need all of them. Just the basic tools will do and some of these rubber stamping supplies can be substituted with items around the house.
Rubber Stamps
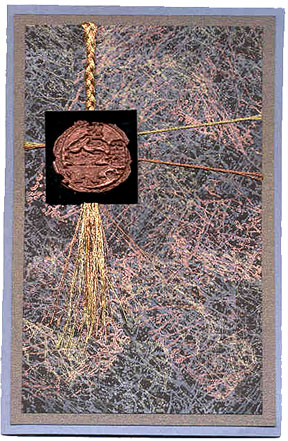
Wood-mounted Stamp

Thank God for rubber stamps! With rubber stamps, we can create beautiful professional looking greeting cards at home even without any artistic training. There are lots of rubber stamp companies and most have their own inhouse artists who design the images that are made into rubber stamps. Just do a Google search on rubber stamp companies. You will come up with quite a list of them. Check them out. Look at their rubber stamp designs and see if they are what you like. Different company has different style of rubber stamp images. My favourites are Hero Arts Rubber Stamps, Penny Black Rubber Stamps and Magenta Rubber Stamps. I am also getting to like House Mouse Rubber Stamps images. Some of these stamp companies are Angel Companies and will freely allow us to sell our handmade cards with their images so long as we handstamped every one of them. NOTE: I will be adding a page on Angel Companies soon.
Tips: If you are not able to find them in your local craft stores, you can search for rubber stamping supplies online. On the Google Search Toolbar just type in the words: "rubber stamping supplies" and click Search. There are many Rubber Stamp Stores online and they will mail out to almost anywhere.
A Bolio
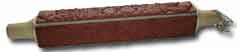
This is a Judi-Kins' bolio. It's like a rolling pin with four sides. On each side is a long strip of red rubber stamp. It's great for stamping borders. Or just stamp, emboss and cut out into smaller pieces and glue to cardstock.
Cube Stamp

A cube rubber stamp is like the Judi-Kins' bolio. But it has 6 square sides. Not all the sides has rubber. One side is the printed image of the stamp. The instruction is on the second side. And a third side has on it the company's name, address and barcode. The rubber stamps are on the rest of the cube. The one shown here is from Stampendous, Inc. It is a Marble Cube. The instruction tells us which side to stamp first and for example, the one I have, when you have stamped all the three rubber stamp images on top of one another on your card, you get a marble image. Another cool tool!
Foam-mounted Stamp
Instead of wood, this rubber stamp is mounted on thick foam usually black in color. These are cheaper than the wood mounted stamps.
Rubber Sheet
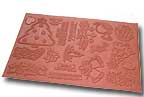
This is a whole sheet of unmounted rubber stamp. It's much cheaper than buying the wood mounted stamps. Only thing is you need to mount it yourself and the whole sheet might has in it certain images you do not want or need. Or you can purchase the individual stamp image. This is called Unmounted Stamp. I find it cheaper to buy these since I like to buy online and these are lighter in weight and so does not cost much in shipping. Cut around the images and glue to thick foam.
Batik or Textile Stamps
 Batik Stamps
These are textile stamps. I bought these from a Nepalese lady. The images are carved directly on the wood. The stamped images are not as sharp as the rubber stamped images.
Other Essential Rubber Stamping Supplies
Heat Gun
 Heat Gun
One of the favoured heat gun for rubber stamping is the Milwaukee. It is rather inexpensive and will meet most of your need. If you are not doing much heat embossing, then a small hot plate is sufficient. In fact, there are many rubberstampers who are using a small coil stove or hot plate. I used a Black and Decker heat gun for quite a while but when I found a heat gun in Spotlight (an Australian craft superstore), I discarded the Black and Decker heat gun altogether. For one reason, it is rather heavy and the heat is too strong and uncontrollable. I burnt lots of my cards using the Black and Decker. Now my current heat gun is superb. I love it and use it often. If you ask me what heat gun it is, well, I do not know. It has no brand on it. See the photo above.
Brayer
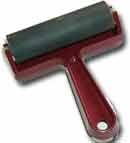
I find the brayer very useful for doing card making background. Roll it in one direction on a ink pad over and over again a few time to get the ink evenly on the rubber. Then roll on your cardstock. Try using it with the Kaleidacolor(Raised Rainbow Dye Inkpads). You just have to include this tool in your rubber stamping supplies shopping list if you do not own one yet.
Brilliance Inkpads
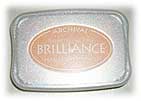
Another one of the many great rubber stamping supplies. I love these inkpads. They are great on glossy cardstock. Only thing is that it is harder to clean the rubber stamps after use.
Petal Inkpads
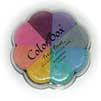
I like to take out each petal and apply directly on cardstock but the foams tend to come out easily.
Tip: Dry the plastic part and apply glue. Then stick back the foam.
Stazon Inkpad

Another great pad for glossy cardstock. Love to use these on CDs too. Very difficult to clean your stamps though after inking with these pads.
Card Making Tips: To clean the rubber stamps after using Brilliance Inkpads or Stazon Inkpads, I usually use baby wipes. Then rinse with clean water and leave to dry. The normal stamp cleaner will not do.
Shadow Ink Pad
Use these with the Hero Arts Shadow rubber stamps.
VersaMark Ink Pad
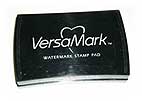
Great for making
watermarks on papers. Use this to lubricate your rubber stamps when you find the rubber drying out. You can also ink your stamps with this inkpad before stamping with Brilliance Ink so that it will be easier to clean up.
Brush Markers
I love the Marvy Brush Markers and use them for most of my cards. They have a wide range of colours and though I use them a lot, the brushes still work like new and does not dry out like other brushes. Just scribble each colour on your plastic palette or a foam plate. Wet a clean watercolour brush and pick up the colour. Apply the colour to your stamped or drawn images just like using watercolours. In comparison with watercolours, the markers' colours are more vibrant and richer.
Embossing Markers
Use these directly on the rubber stamps. Great for applying different colors to the image. The Marvy Embossing Markers stay wet long enough for us to pour on embossing powder to heat emboss the image. I like to emboss with clear embossing powder. You will see the raised image with the markers' colors below. Cool!
Card Making Tips:
Store your markers in drawers or tray somewhere near your workplace. You will use them very often and storing them this way will ensure that you do not need to press hard for the ink to flow easily.
FREE Monthly Newsletters!
Do subscribed to the GreetingNews! Ezine and stay connected with me and I will update you with the latest news and happenings in the art of cardcrafting. Thank you! If you have to contact me, click here.
Making Greeting Cards! › Card-making Tools and Supplies › Here
Like This Site?
|
| |
Celebrating Creativity! Connecting Lives!
~ bringing cheer one card at a time.
Help Me Get The Word Out
If you like making greeting cards and want to encourage others to do so because of its many benefits, please help me share this website with your friends. Just click on the share buttons below to share with your fans and friends. Thank you for sharing the good things in life :-)

Hi! Welcome to my card-making website. My name is Flora Grace and I'm an avid crafter and love creating stuff with paper.
I love to connect with you so do sign up for my e-newsletter which is totally free and receive fresh news every month.
Recent Articles
-
Shaped Birthday Greeting Cards Are So Fun and Unique
Aug 01, 23 01:41 AM
 Let's make Birthday greeting cards in various shapes. Why just a regular card? Make it fun with all kinds of shapes for your diy birthday cards or invitation cards. These birthday fun cards are great…
 -
Cards Verses for Your Greeting Cards
May 15, 23 05:10 AM
 List of cards verses for all occasions. Need words, quotes or poems? Free wordings to use for your greeting cards.
 -
Heartfelt Birthday Wishes for Friends and Family
May 15, 23 05:04 AM
 Birthday wishes for friends and family to include in your birthday cards.
 -
Other Card Makers And Their Handmade Cards
Oct 08, 21 01:16 AM
So many card makers have sent in their handmade cards. View their creations and be inspired by their card making style and techniques. -
Barbara Phelps 4 - Fourth Page of Handmade Cards
Oct 08, 21 12:04 AM
 Barbara Phelps 4 is the fourth page of beautiful handmade cards personally created by Barb, a creative crafter and reader of this card-making site.
My Other Websites
Copyright © 2004-2024 Flora Grace | Making-Greeting-Cards.com (aka HeartInCard.com ) | All rights reserved.
Making-Greeting-Cards.com has affiliate partnerships and may earn commission on products purchased through affiliate links. These partnerships do not influence our editorial content. Making-Greeting-Cards.com does not sell any personal information.
New! Comments
Have your say about what you just read! Leave me a comment in the box below.