- Home
- Birthday Cards
- Tulip Rubber Stamp
1 Tulip Rubber Stamp - 2 Simple Card Making Ideas
I used this tulip rubber stamp to make two simple greeting cards. Both are simple to make and with different feel and style.
The first one is rather rugged and very easy to make while the second one will take a bit more time and effort. Overall, I prefer the second card better.
You do not need to run out to buy a this tulip design rubber stamp to make these cards. Just substitute with botanical rubber stamps you have at home.
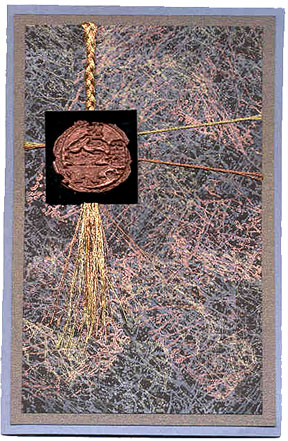
 Thank You Card
Card Making Supplies:
- Dark Brown Colour Blank Basic Card
- Small Piece Of Green Colour Card
- Small Piece Of Cream Colour Card
- Raffia
- Tulip Design Rubber Stamp by Hero Arts Rubber Stamps
- Words Stamp: Thank You Very Much by Hero Arts Rubber Stamps
- Colour Markers: Brown, Yellow & Green
- Water Brush
- Glue
- Paper Trimmer
- Heat Gun
- Black Embossing Powder
- Memories Black Inkpad
Card Making Instructions:
Tips: Do not rock the rubber stamp. Rocking will cause the stamped image to have thicker outline.
- Gently tap tulip design stamp on the black inkpad. Press stamp on the small piece of cream colour card.
- Pour on embossing powder and tap off excess powder. Melt powder with the heat gun.
- Brush brown colour marker on the words stamp - only on the words "Thank You".
- Brush green colour marker on the words stamps - only on the words "very much!"
- Press words stamp on the cream card on the right of the tulip image.
- Use water brush to pick up color from the color markers and apply to the tulip embossed image. Blend well.
- Tear card on the left and trim with cutter on the other three sides and layer on green color card and then on the brown basic card.
- Pierce holes and thread raffia and tie a bow. Apply a dab of glue to the bow to fix it.
Card Made with Same Tulip Design Rubber Stamp

Card Making Supplies:
- Brown Colour Blank Basic Card
- Small Piece Of Green Colour Card
- A Piece Of Cream Colour Card
- Tulip Design Rubber Stamp by Hero Arts Rubber Stamps
- Colour Markers: Red, Yellow & Green
- Water Brush
- Glue
- Paper Trimmer
- Memories Black Inkpad
- Green Inkpads (2 shades)
Card Making Instructions:
Tips: Place a clean tissue or copier paper under your card and stamp over the edge of the card.
- Gently tap tulip rubber stamp on the lighter shade of green inkpad. Stamp randomly on the cream colour card.
- Now tap tulip rubber stamp on the darker shade of green inkpad. Stamp randomly on the cream colour card.
- Gently tap tulip rubber stamp on the black inkpad and stamp on the small piece of cream card.
- Use water brush to pick up color from the color markers and apply to the tulip stamped image. Blend well.
- Trim card and layer on green color card and then on the brown basic card.
Making Greeting Cards! › Rubber Stamping › Here
Like This Site?
|
| |
Celebrating Creativity! Connecting Lives!
~ bringing cheer one card at a time.
Help Me Get The Word Out

If you like making greeting cards and want to encourage others to do so because of its many benefits, please help me share this website with your friends. Just click on the share buttons below to share with your fans and friends. Thank you for sharing the good things in life :-)
Top of 2 Simple Card Making Ideas For Your Tulip Rubber Stamp

Hi! Welcome to my card-making website. My name is Flora Grace and I'm an avid crafter and love creating stuff with paper.
I love to connect with you so do sign up for my e-newsletter which is totally free and receive fresh news every month.
Recent Articles
-
Shaped Birthday Greeting Cards Are So Fun and Unique
Aug 01, 23 01:41 AM
 Let's make Birthday greeting cards in various shapes. Why just a regular card? Make it fun with all kinds of shapes for your diy birthday cards or invitation cards. These birthday fun cards are great…
 -
Cards Verses for Your Greeting Cards
May 15, 23 05:10 AM
 List of cards verses for all occasions. Need words, quotes or poems? Free wordings to use for your greeting cards.
 -
Heartfelt Birthday Wishes for Friends and Family
May 15, 23 05:04 AM
 Birthday wishes for friends and family to include in your birthday cards.
 -
Other Card Makers And Their Handmade Cards
Oct 08, 21 01:16 AM
So many card makers have sent in their handmade cards. View their creations and be inspired by their card making style and techniques. -
Barbara Phelps 4 - Fourth Page of Handmade Cards
Oct 08, 21 12:04 AM
 Barbara Phelps 4 is the fourth page of beautiful handmade cards personally created by Barb, a creative crafter and reader of this card-making site.
My Other Websites
Copyright © 2004-2024 Flora Grace | Making-Greeting-Cards.com (aka HeartInCard.com ) | All rights reserved.
Making-Greeting-Cards.com has affiliate partnerships and may earn commission on products purchased through affiliate links. These partnerships do not influence our editorial content. Making-Greeting-Cards.com does not sell any personal information.
New! Comments
Have your say about what you just read! Leave me a comment in the box below.