- Home
- Birthday Cards
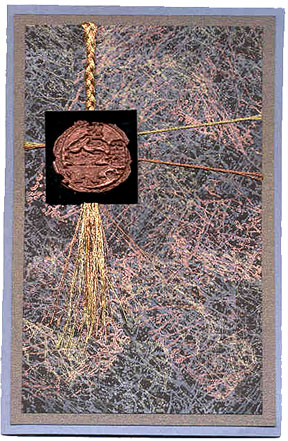
- Vintage Butterfly Card
Vintage Butterfly Card
This vintage butterfly card is my take on an antique aged look card using Tim Holtz's so artistic rubber stamps and his signature Distress inks.
|
I love vintage and prints. - Georgina Chapman |
Click on any of the images below to see a gallery of cards on this page. |

I have been a fan of his books and products for quite some time and whenever possible will indulge myself making some artistic cards just for the sheer fun of creating.
Vintage Butterfly Card

The above handmade card also spotted two rows of stitches on the top and at the bottom using We'R Sew Easy tools; the stitch used here is the backstitch.
Supplies for this Vintage Butterfly Card
- thick watercolor paper 8.5" x 6.25"
- cream color card stock 4" x 6"
- vellum 3" x 7"
- ranger distress inks: tea dye & rusty hinge
- rubber stamps: stampers anonymous - tim holtz collection - papillon cms 106
- ranger ink blending tool and foam
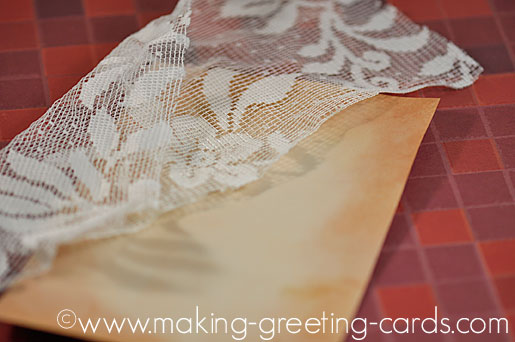
- a piece of lace
- we'r memory keepers sew easy stitch piercer
- we'r memory keepers sew easy ruler and foam mat
- adhesive
- needle and thread
- heat gun (optional)
Directions for Vintage Butterfly Card
- Score and fold watercolor paper at centre to make a blank card.
- Ink blending applicator with distress ink - tea dye color and apply with circular motion on cream color cardstock.
- Dry with heat gun. (Put aside to dry if you do not want to use a heat gun)
- Ink blending applicator with distress ink - rusty hinge and apply with circular motion on some portions of card.
- Dry with heat gun.
- Place lace over card and ink blending applicator with same rusty hinge ink and tap or rub over lace.
- Ink the background image with rusty hinge ink and stamp on card to complete the background card.
- Ink stamp with the four butterflies and stamp onto vellum with same rusty hinge ink.
- Dry with heat gun.
- Tear vellum on both sides of the stamped butterflies.
- Place vellum over centre of background card, then slip under the Sew Easy ruler, align and use the backstitch piercer to pierce running holes along the top and bottom of the vellum and card.
- Thread needle and sew.
- Fold vellum top and bottom flaps over and beneath the card
- Run adhesive over the underside of card and adhere to the folded card front.

Vintage Quotes
There's a vintage which comes with age and experience.
- Jon Bon Jovi
I love vintage shopping, I think it's really fun. And I love the feeling of finding the most amazing piece for less.
- Emma Roberts
If I have an hour in a city, I go to vintage stores first because it's so much cooler to find a piece that is unique. I love the thought of some girl having worn it before and living her life in it.
- Helena Christensen
My most cherished possessions are my grandma's letters and my vintage Martha Washington cookbook.
- Sandra Lee
You might like these
Fun Cards To Make With Children Or Friends
Fun cards to make using Spirograph and other enjoyable techniques. These are greeting cards made with fun techniques for the sheer joy of creating.
Green Stamping Veggie Cards
Try green stamping! It's fun for children and yourself. Make your own stamps from vegetables and make some fun veggie cards.
Like This Site?
|
| |
Celebrating Creativity! Connecting Lives!
~ bringing cheer one card at a time.
Help Me Get The Word Out

If you like making greeting cards and want to encourage others to do so because of its many benefits, please help me share this website with your friends. Just click on the share buttons below to share with your fans and friends. Thank you for sharing the good things in life :-)

Hi! Welcome to my card-making website. My name is Flora Grace and I'm an avid crafter and love creating stuff with paper.
I love to connect with you so do sign up for my e-newsletter which is totally free and receive fresh news every month.
Recent Articles
-
Shaped Birthday Greeting Cards Are So Fun and Unique
Aug 01, 23 01:41 AM
 Let's make Birthday greeting cards in various shapes. Why just a regular card? Make it fun with all kinds of shapes for your diy birthday cards or invitation cards. These birthday fun cards are great…
 -
Cards Verses for Your Greeting Cards
May 15, 23 05:10 AM
 List of cards verses for all occasions. Need words, quotes or poems? Free wordings to use for your greeting cards.
 -
Heartfelt Birthday Wishes for Friends and Family
May 15, 23 05:04 AM
 Birthday wishes for friends and family to include in your birthday cards.
 -
Other Card Makers And Their Handmade Cards
Oct 08, 21 01:16 AM
So many card makers have sent in their handmade cards. View their creations and be inspired by their card making style and techniques. -
Barbara Phelps 4 - Fourth Page of Handmade Cards
Oct 08, 21 12:04 AM
 Barbara Phelps 4 is the fourth page of beautiful handmade cards personally created by Barb, a creative crafter and reader of this card-making site.
My Other Websites
Copyright © 2004-2024 Flora Grace | Making-Greeting-Cards.com (aka HeartInCard.com ) | All rights reserved.
Making-Greeting-Cards.com has affiliate partnerships and may earn commission on products purchased through affiliate links. These partnerships do not influence our editorial content. Making-Greeting-Cards.com does not sell any personal information.
New! Comments
Have your say about what you just read! Leave me a comment in the box below.